This is for those who hasn't seen my 2 final video work.
Friday, 20 March 2009
Tuesday, 17 March 2009
FINISHED BABY YEAH!!!
Well all both my submissions has been delivered I'm quite happy with the movie even though there's always room for improvement. I'd like to thank my homies (I think that's how you spell it) who helped me in the process, Alec, Dan, magic D. bothom, Lewis, Jared, Mu Li and Simon. Now all that's out of the way, I'm gonna see how lucrative and exciting I can make this holiday, but right now I'm off to play Resident evil 5, Peace!
Wednesday, 11 March 2009
Nah Living In Colour

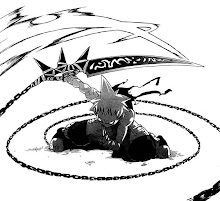
 Well after getting the runnings, self harm tears and singing some Oklahoma I finally manged to get Nah complete. But I have to say that the computers, are utterly pants! Jeez almost everything started falling apart becuase maya decided to two-face on me and work when it wants to. The same procedure was used in order to colour the modlle like lamberts, blins and using the shell typology to colour him. I was actually able to use photoshop which made colouring a lot faster, before there was an error that would.n't have it. There is still something I wanna do with the mask like adding a blin on it but if it messes up I'm leaving it out.
 I added an occlusion on these pics to try and bring out it's full visual potential. Not much to say on this moddle now. But I've had a somewhat good experience on modelling and texturing, I just need to practice more on these elements in order to get better. However I am seriously not a maya person. But going back to the moddle I have to say that Lewis and Josh's moddles looks scik compared to mine, I'm almost starting to wish that had clothes or that I wish I did Kieth, but because I wasn't confident in my abilities of modelling I chickened out. However the next time or more likely in my own time I'll learn to modell clothes. Well that's about it I've fought the climatic battle of my sanity vs maya and surprisingly I'm still sane, which is good. Next I have to go and make a little movie to sum up my work, so stay tuned!
Tuesday, 10 March 2009
Occlusion Fusion BAK

 Well here he is my friend Lewis, helped me with the occlusion colour of this jive turkey (dunno what it means but it sounds funny) anyways no big post today so I'm gonna get on with my second one...Nah. Stay tuned! P.S the skirt looks mighty fine and sexy.
Monday, 9 March 2009
Living In Colour!


Well today turned to be pretty good. I ran into a few problems earlier on as I came in this morning but I managed to get around it. The problems were consisting of the typology of the shell. When it came to flattening out the image it kepf messing up, but also I could tell that when it did flatten, the head was modelled all that symmetrically...at least I don't think so. Another thing that I noticed was the fact that there were two pieces of my head typology as I selected and viewed it in the Texture editor. After looking at the UV points I realised that one part represented the back of the head the otherwas the front and side of it. So when it came to sewing the uvs together it messed up. After trying again and again I started paying attention to the highlighted texture borders, which are think lines in the typology. My theory is this, instead of haiving one solid line from the back of the head and to the front, I had two others on either side of the head. I could see the shape that the thick lines created when I unfolded the back of the texture. So to remedy this I deleted those lines on either side, but to no avail. So I followed the book as closely as possibled and Idecide to cut the middle line from back to front. There was nothing I could do about the back of the head since I simply had no clue on how to fix it, beside the hair would be covering the back anyways. Lastly to test it I added a checker texture to the moddle to see how it would look, the squres looked a lot better than before.
Next came the colouring, which wasn't bad to tell the truth this was when things were starting to get better slightly. There were two methods of colouring, one was taking the UV into Photoshop and colour it but I think due to the crappiness of the PC, it gave me a message saying "invalid name". So another way was saving it as a "TIFF" and opening paint to get it in, but even then I could only save in certain places. I decided to stick to the model as close as possible, obviously but the skin looked kinda dull and I didn't want that for the hair, so my friend Lewis suggested adding a blin texture to it aswell as the eyes. It worked wonders. The couloring of the body wasn't difficult but the skirt was something I wanted to make stand out. I wanted it to have a certain texture to it so I made texture in photoshop and tried to upload it in maya....surprise, surprise it didn't work, but thank God for Alex and Dand Edgely for helping me fix that. They also suggested a bump map on the texture to hepl it stand out. In the render view the skirt looked a bit flat still so I added some creases and folds in it to make it more 3D-ish, and the result is what I've posted.
I'm thinking of adding an occlusion on this just to try and make it look like eye candy as much as possible. I just hope that tomorrow will be as successful as it was today, so stay tuned.
Sunday, 8 March 2009
Checker Texture?


 Well after following the good books directions this is what I've achieved. I thinh it does this in order to see how the texture would look if it were textured properly, like at the beginnig the texture didn't cover the whole body, only bits of it. However afters some adjustments in sub-menues and such it came out like this, so as far as I understand this is a test. To be honest I dunno what the heck I'm doing on this model all I can do is look at the pics the book shows me, compare it to my own and ask myself, "does it look right?" Well I got no clue. All I cans say is the body texture seems to wrap around quite well as for the head, I have a gut feeling that its wrong. But I decided to take a step back in my model and that's what the head looked like before I went messing around in the Planar mapping menu(the top picture). This looks more accurate than the last and it seems to look more accurate with the pictures in the Maya book so I'm gonna leave it like that and see how it turns out. I'm gonna break for now but I'm gonna save two versions just to be safe, stay tuned.
Neck baby yeah!

 No big post today, this is just to show that I have manged to join the neck to the head...hopefully the right way. What I did is , I shorted the neck a bit then I just move the vertices from the head to the neck and merged them together, that's about it really. As far as I'm concerned last week was a success for me since I managed to complete my composition work and export it as a quick time. Speaking of export, Lewis had trouble with exporting his movie. We were there till 6:00pm trying to get it to export, but there was some sort of error with After effects. It could do an AVI which looked pants, but not quick time. Apparently it was the computers that were at fault, that's what Max a fellow student told us....so yeah unlucky.
Next is the texturing which is a completely new area for me, I dunno if I'm gonna be able to get it looking right or if I'm able to follow and undrestand the directions properly, only time will tell and I don't have enough of that left. As far as looks go I might go for your typical The Incredibles look or maybe the toon shader, this is gonna be a painful matter of trial and error...so stay tuned.
Thursday, 5 March 2009
Bak Face!
 SUCCESS: Yeeeaaahhh! With the help of Lewis and Magic D. Shuffle I was able to get the face done. In the begining I only had the sphere with a nose and I had little idea on how to approach everything else. Plus my Maya on PC is not as efficient as the Maya here and I also had some display issues, such as the perspective camera getting the the way. However when I came in today Dan managed to help me out, God bless. But anyways onto the methods.
 Method 1: First Lewis helped me out by starting with the eyes, though we had to shape the nose a bit more first, but before that he cut the left side of the head first since it would be mirrored (never thought of that) and started withe the eye socket. He went into faces mode and created the socket in the shape of a rectangle and cutted out the middle bit. Next we inserted the eyes and posistion it so that the socket would wrap around the eyeball, it was achieved by moving the vertices. Next we did the brow with the help of the edge loop tool and extended it outwards. After that we did the mouth and lengthened the nose, since it was quite a long way from the mouth. Afterwards I needed to shape the head more rectangular like because it was too round, the back of the head was a bit tricky and long, I had to make the head line up with the back of the neck. Next I did the front and side of the head.
 Method 2: Next was the hair, to make sure it had volume Lewis suggested a cube, flattened and extended lengthways. He then then showed me how to wrap it around the head. Afterwards it was a matter of pulling vertices coupled with the edge loop tool and make the points straight in order for it to be mirrored. Now....mirroring the hair was easy but the head was a problem, the head mashed up itself even though the vertices were straight. After numerous attempts changing options etc. Dan helped me to rectify the problem, even he didn't know what was wrong but with some changes in the mirror options he did it, although it required me going to each each middle vertices and merging, front and back. Oh yeah had to do the same for the hair too. -__-
 CONCLUSION: This turned out to be a pretty good day considereing the help I had. I learned some things along the way that will no doubt help me in the future. It's just a shame about that nurbs modelling that I did, turned out pointless in the end but not completely, like I said I learned some things heh. But yeah both my models are more or less finished all that's left is the texturing, I'm thinking something cartoony. So...stay tuned for my next post just over a week to go eeep! O__O
Sunday, 1 March 2009
Nah Transformed!
 Well, I'm glad that Lewis's plan worked to some extent, he also said that game industries do this all the time, use existing limbs and parts to make other characters instead of starting from scartch. Take Metal Gear Solid for instance. Anyway I was able to get Baks body proprtions more or less correct, with a few vertice movements there, a few scalings there and so forth. In the beginning I tried to do what Lewis said about deleting parts and using them on an already existing torso, but when it came to deleting for example the leg, difficulties began to arise like a bat out of hell. You see where the vertice points are concerned I had no idea how I was gonna merge them. The same issue occured with the hands, it just broke up the topolgy too much when I used the Face mode to cut them. So I figured the body is similar in shape it's just larger, so I decided to make it thinner, that's where the slimfasting came in. Overall I'm quite proud of it, but as usual refinements need to be made.
 I'm very happy about the belly, as you can see I didn't bother with the drawings of Bak since I already have them on paper. The thing I wish I could get though is the belly button to stick out like a dangling....erm...thing, but as Josh said "harder than it looks". But anyways how I achieved this is just first selecting the approprate vertices and scaling and squishing them, the going into the 4 views and moving them with the move tool. I also think I had to delete some vertices along the way, but I don't think it was this section.
 The back of Bak...lol. This I'm also proud of it wasn't here that I had to do some deletioons but it was the top half of the torso. again the same principle was done to achive this. Not much to say on this part.
 The skirt, yup not too difficult for me too hande just a matter of scaling the vertices. I must say I'm very happy with my progress. Today is the 1st of March and there's not long to go before we do the submission. I just hop the the shading and texturing go well and get this done before Fri Resident Evil 5 is coming and I don't wanna miss that. But I'm begining to rum out of energy here, with the modelling that is. But I got no choice but to push forward, with my trusty Maya 7 book I shall overcome this and have redemption. I just need to refine some more and then start on the head...eep! Stay tuned.
Friday, 27 February 2009
Nah Model near completion


 Sigh...the last two days has been somewhat eventful, well except for today that is. Today I came in with a mission in mind, to get fruther in the completion of my compositing project, but today turned out to be a crappy, F.U.B.A.R. experience. I was basically trying to export my my movie file into Maya to work on and the difficulties I faced on that was just a real itch. First the computer wouldn't let us render or save, it was saying that the name we save it in is invalid even though it gives us a name to save by default. Also after Gareth hepled me for so long trying again and again magic D. Shufflebothom and his sidekick Dan Edgely I think, came to the rescue and finally managed to get it exported into Maya after so much hassle with naming the files right, because of Mayas knit-picking. This took me well overe lunchtime, but it didn't stop there. The footage was to slow to work with because the tiff files were too big, so we had to import again and...yeah it was just a bad day but I found a solution to my problem.
Anyways let's go to something more positive, yesterday Jamie came in and helped me with my mask and head plus Lewis helped me with it as well, above are the results. Also the skirt was a lot more simpler to do than the tutorial I posted Jamie used a tool make a poloygon and extruded it to fit around my character and cut vertices in it to make it into a cloth-like skirt.
I'm very happy with my model so far, it could use some more tweaking but, I'm considering texturing it in a very short while. Also Lewis gave me a great tip to speed up the modelling process of my work flow. Since I'm gonna model another human character, he suggested that I cut and save some body parts from the Nah model and mold them to the character I want. So I'm think of deleting the character I have but only leave the torso and modle it into the shape I want.
Time is running out so I think this may be a pretty solid method so it's worth trying, ain't got nothing to lose, well maybe I do but not something serious. Anyway stay tuned for my next post, because the next model will be Bak Bak Van Bak.
Time is running out so I think this may be a pretty solid method so it's worth trying, ain't got nothing to lose, well maybe I do but not something serious. Anyway stay tuned for my next post, because the next model will be Bak Bak Van Bak.
Wednesday, 25 February 2009
Nurbs Patch Modelling....Socking? Part 2
 Alrighty from what the book says, it will impossible to connect these two into a smooth transition because of the toplogy, so the sphere will have to be rebuilt using the rebuild surfaces opt (option). I will have to create more spans for it.

 Like this. Afterwards I delete the both ends of the cylinder and I select the top of the cylinder and the top of the sphere. Then I select the attach surfaces tool with the rebuild surfaces tool, while making sure I use the keep CVs option.
Like this. Seems like we're well I'm almost there, just need to close the gaps in the corners. Argh! my photoshop does not want to work for me now but I'll try and post an image later all that's happened is that I did the same process for the corners in the sphere. Jus make sure when you cut the isoparms it's where the two surfaces joined, for a while I've been selecting the thick ones. You'll know you've got it when you try to select the 2 and one of them is purple.
 Wait, wait...it's working. Well here you know what I'm talking about, but interestingly enough it seems that the joining process will only work if you do it in a particular order, or maybe it's just me, but it seems that whenever I choose a surface to attach it would go nuts on its self. Oh well nearly done.
 COMPLETE: Now to get this you do a whole selection on the whole model and you use the Global stiching tool. Ideally this is supposed to close the remaining gaps however, it didn't but you can sort it out by clicking on any surface that you stiched, and in the inputs section you fiddle around with the max separation value, in small increments until the gaps go. In this case the value was 0.1 so I put it up to 0.5. Well I hope this will be useful, it should be because there's a section where it says detach the hips surfaces, this is what is done to make the skirt but it then goes on to say component mode....? Anyways it seems that the book shows how to model using polygons and in NURBS, this is you need lots of visualisation experience in order for it to look perfect. Well I'm sure this isn't the only way to model a skirt but at least I've found a tutorial that may help my problem solving. Stay Tuned.
Nurbs Patch Modelling....Socking? Part 1
 Yo, today I'm stepping away from my model for a bit and I'm learning about Nurbs Patch modelling. There's a method that I've come across called Socking, I haven't gone deep into it but it but I know that it can help when modelling difficult complex shapes like the shoulders for instance. What's going on up in that picture above is a detached sphere, it has been detcahed by me making it into an isoparm which turns it blue. Now when that happen you have to look for the linethat seems ticker than the rest andwhen you've found it, you select it and you then select the detach surfaces tool and it will cut it in half. The tool is the 4th from the left in the tool box. After that you then turn it into an isoparm and look for the thick line oppsosite the one you cut. Then you delete.
The reason why I'm learning this is because in my Maya 7 book it models 2 characters one of them being female. After looking through some of the section on the female it came to a bit where it said detcah the hips surface at the second isoparm. This section is in regards to creating the skirt, so I'm gonna learn the basics about isoparms in order to create a skirt for my character. Now what I'm gonna do with the cylinder and the sphere is turn it into a one joined object that looks like a simplified version of an arm and shoulder. I'll post some images of my progress as I go along. This is the first part, so stay tuned for the second.
Tuesday, 24 February 2009
The Gods, The Funnies and the Inspirations
 This is I'm sure you know the famous band Gorillaz artist is by Jamie Hewlett. The thing I like about this art piesce is the simplicity of lines he uses on the characters and the fact that not much shading is involved but it still manages to make the art stand out.
 Ah yes Timon, from Timon and Pumbaa he definitely played a part in my character creations especially Jappa, the Jamiacan silverback Gorilla
Sean Galloway... me, Lewis, Josh dunno about sam though are all envious of his simplistic style and his ultra light use of lines to help for his characters. We all wish we could draw like him.
 Khary Randolph, if there was an artist I'd like to be like he would be one of them. This man has worked on numerous projects for numerous cartoon and comics one of them being Nickelodeon. Here's his website to learn more...http://www.kharupt.com/
 Oh my gosh this guy's sick hot! At drawing I mean. His style reminds me of Disney a little. He definitely sent me into a drawing frezny when I was trying to step away from anime. There are other artist out there but these are the ones I wanted to show. I'm alwas thinking and trying to expand and right now I'm in the middle of creating my own storyline and characters for my own amusement, I'm also working on an experimental style so keep it on the down low you dig?
Here's the web address...http://www.herrerabox.com/blog/
Since I didn't do any research, from the industry. I decided it was time to go ahead and do it. Now this vid was not what I had in mind to post. You see the vid is about the making of God Of War 2 but I wanted God Of War, but this is good enough I suppose. It bascically shows how they took Greek mythology the mentality of the main character Kratos and mold it into a sick videogame. If you haven't played this game or the one before it GO BUY IT NOW! I'm serious.
Ahhh....this show has held a special place in my heart. Whose Line is it Anyway I know I did this before but I wanted to do another to refresh y'all memories. This is the inspiration I used to get the idea for a spoof informercial. Just watch it, it's good...it's got high views on Youtube so it must be good.
Head & Mask Attempt


It looks pretty basic right now, so I dunno if it's right to be calling it a success or not. No problems were encountered here, so here's the method I used.
1. First I created a sphere by going to Create-Polygons Primitive-Sphere.
2. I scaled it to the size I wanted and positioned it to align with the top of the torso.
3. Next I deuplicated it and chopped it in half, by this time I realised they were too round according to the reference I had so I decided to select both and slim them down a bit.
4. Lastley I did the same process for the sphere except I went to cylinders. Then it was a matter of aligning them and that was it.
I'm not sue how I go about making the mask look good, like how to make the cylinders merge into the mask. Also the 2 holes for the eyes needs to actually seem like holes that the eyes see through, not just texture. I'm gonna need Alexs help for this however, I got no clue on when he's gonna show up, otherwise it's gonna be another study lesson of looking in my Maya book. Either way times running out and I don't have time to idle. I think If I manage to get this model done before the deadline then that's a real achievement for me, it would be nice to have to but I'd have to be sniffing something to think I can get that done. Sigh....anything else I need to say...well I've been working nearly two hours on maya and posting anyways so I might as well take a break, but before that I got one more thing to do, stay tuned!
Hand Refinement
 Short post on this one. Yup as you can see I've refined the hand, wasn't too much trouble just a simple matter of adding vertices to improve the shape and flow of the topology. There's not much to say on these pics. they're all self explanatory.....however
 There's another problem bugging me. The skirt that my charater wears is something I'm gonna need to conquer. But After looking at the Maya book, I figured that it's going to have to do something with Isoprams. I just have to locate the tool and see if I can apply it to my model, but my spidey sesnses tingling tells me it's not gonna be easy. Since we're on the subject of clothing I found this interesting tutorial on Youtube about ncloth wrinkles in maya. It basically shows you how to create a bed sheet of sorts that looks like it flows in the wind as it drops through the air. See interesting. Anyways I did try to create the skirt by clicking the waistline verticey points and extruding them take a look at the bottom.
Yeah the first attemp was when I selected the poinst and decided to extrude, Maya decided to do this for me....strange isn't it? Next I decide to use the move tool and this is the result, look at the next pic for all you boys and girls who want a little fanservice LOL!
Yeah needs some work, obviously not the right approach to go through, so I'll have to play master Splinter and ponder on this matter further. Although before I do that or more ideally in the mean time I'll start on the head...how hard can that be? Stay tuned, peace!


Subscribe to:
Posts (Atom)