This is for those who hasn't seen my 2 final video work.
Friday, 20 March 2009
Tuesday, 17 March 2009
FINISHED BABY YEAH!!!
Well all both my submissions has been delivered I'm quite happy with the movie even though there's always room for improvement. I'd like to thank my homies (I think that's how you spell it) who helped me in the process, Alec, Dan, magic D. bothom, Lewis, Jared, Mu Li and Simon. Now all that's out of the way, I'm gonna see how lucrative and exciting I can make this holiday, but right now I'm off to play Resident evil 5, Peace!
Wednesday, 11 March 2009
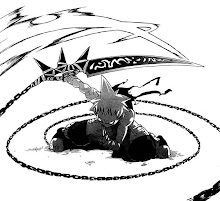
Nah Living In Colour

 Well after getting the runnings, self harm tears and singing some Oklahoma I finally manged to get Nah complete. But I have to say that the computers, are utterly pants! Jeez almost everything started falling apart becuase maya decided to two-face on me and work when it wants to. The same procedure was used in order to colour the modlle like lamberts, blins and using the shell typology to colour him. I was actually able to use photoshop which made colouring a lot faster, before there was an error that would.n't have it. There is still something I wanna do with the mask like adding a blin on it but if it messes up I'm leaving it out.
 I added an occlusion on these pics to try and bring out it's full visual potential. Not much to say on this moddle now. But I've had a somewhat good experience on modelling and texturing, I just need to practice more on these elements in order to get better. However I am seriously not a maya person. But going back to the moddle I have to say that Lewis and Josh's moddles looks scik compared to mine, I'm almost starting to wish that had clothes or that I wish I did Kieth, but because I wasn't confident in my abilities of modelling I chickened out. However the next time or more likely in my own time I'll learn to modell clothes. Well that's about it I've fought the climatic battle of my sanity vs maya and surprisingly I'm still sane, which is good. Next I have to go and make a little movie to sum up my work, so stay tuned!
Tuesday, 10 March 2009
Occlusion Fusion BAK

 Well here he is my friend Lewis, helped me with the occlusion colour of this jive turkey (dunno what it means but it sounds funny) anyways no big post today so I'm gonna get on with my second one...Nah. Stay tuned! P.S the skirt looks mighty fine and sexy.
Monday, 9 March 2009
Living In Colour!


Well today turned to be pretty good. I ran into a few problems earlier on as I came in this morning but I managed to get around it. The problems were consisting of the typology of the shell. When it came to flattening out the image it kepf messing up, but also I could tell that when it did flatten, the head was modelled all that symmetrically...at least I don't think so. Another thing that I noticed was the fact that there were two pieces of my head typology as I selected and viewed it in the Texture editor. After looking at the UV points I realised that one part represented the back of the head the otherwas the front and side of it. So when it came to sewing the uvs together it messed up. After trying again and again I started paying attention to the highlighted texture borders, which are think lines in the typology. My theory is this, instead of haiving one solid line from the back of the head and to the front, I had two others on either side of the head. I could see the shape that the thick lines created when I unfolded the back of the texture. So to remedy this I deleted those lines on either side, but to no avail. So I followed the book as closely as possibled and Idecide to cut the middle line from back to front. There was nothing I could do about the back of the head since I simply had no clue on how to fix it, beside the hair would be covering the back anyways. Lastly to test it I added a checker texture to the moddle to see how it would look, the squres looked a lot better than before.
Next came the colouring, which wasn't bad to tell the truth this was when things were starting to get better slightly. There were two methods of colouring, one was taking the UV into Photoshop and colour it but I think due to the crappiness of the PC, it gave me a message saying "invalid name". So another way was saving it as a "TIFF" and opening paint to get it in, but even then I could only save in certain places. I decided to stick to the model as close as possible, obviously but the skin looked kinda dull and I didn't want that for the hair, so my friend Lewis suggested adding a blin texture to it aswell as the eyes. It worked wonders. The couloring of the body wasn't difficult but the skirt was something I wanted to make stand out. I wanted it to have a certain texture to it so I made texture in photoshop and tried to upload it in maya....surprise, surprise it didn't work, but thank God for Alex and Dand Edgely for helping me fix that. They also suggested a bump map on the texture to hepl it stand out. In the render view the skirt looked a bit flat still so I added some creases and folds in it to make it more 3D-ish, and the result is what I've posted.
I'm thinking of adding an occlusion on this just to try and make it look like eye candy as much as possible. I just hope that tomorrow will be as successful as it was today, so stay tuned.
Sunday, 8 March 2009
Checker Texture?


 Well after following the good books directions this is what I've achieved. I thinh it does this in order to see how the texture would look if it were textured properly, like at the beginnig the texture didn't cover the whole body, only bits of it. However afters some adjustments in sub-menues and such it came out like this, so as far as I understand this is a test. To be honest I dunno what the heck I'm doing on this model all I can do is look at the pics the book shows me, compare it to my own and ask myself, "does it look right?" Well I got no clue. All I cans say is the body texture seems to wrap around quite well as for the head, I have a gut feeling that its wrong. But I decided to take a step back in my model and that's what the head looked like before I went messing around in the Planar mapping menu(the top picture). This looks more accurate than the last and it seems to look more accurate with the pictures in the Maya book so I'm gonna leave it like that and see how it turns out. I'm gonna break for now but I'm gonna save two versions just to be safe, stay tuned.
Neck baby yeah!

 No big post today, this is just to show that I have manged to join the neck to the head...hopefully the right way. What I did is , I shorted the neck a bit then I just move the vertices from the head to the neck and merged them together, that's about it really. As far as I'm concerned last week was a success for me since I managed to complete my composition work and export it as a quick time. Speaking of export, Lewis had trouble with exporting his movie. We were there till 6:00pm trying to get it to export, but there was some sort of error with After effects. It could do an AVI which looked pants, but not quick time. Apparently it was the computers that were at fault, that's what Max a fellow student told us....so yeah unlucky.
Next is the texturing which is a completely new area for me, I dunno if I'm gonna be able to get it looking right or if I'm able to follow and undrestand the directions properly, only time will tell and I don't have enough of that left. As far as looks go I might go for your typical The Incredibles look or maybe the toon shader, this is gonna be a painful matter of trial and error...so stay tuned.
Subscribe to:
Posts (Atom)